
GIT for beginners
Introduction
The biggest criticism that GIT has is that is hard to learn for first time users, so that's why I'm making this guide. After a lot of research I found no simple guides for someone who just wants to start using GIT in a professional environment. Maybe you are part of team that is already using GIT and want to catch up or you and your team need to choose a Version Control and like the idea of GIT but don't really know how to use it. That's ok, we will start from the beginning and by the end of this article you should have enough information to
- create a repository on your local computer
- clone a repository with its URL
- keep track of your changes
- use branches to version your code
- share your changes with your team
- merge changes from your team into your code
- rollback changes you regret
- follow the GitHub flow and Gitflow workflows
I'll try to cover all this and explain everything with the right amount of detail so you won't get overwhelmed but end up understanding what you're doing instead of just typing commands or clicking buttons.
Version Control
Before we start talking about GIT, it might be better to start explaining what Version Control is. A Version Control system allows us to keep track of the changes we make to our files. In case we make a mistake we can then "go back in time" to when that mistake didn't happen. This systems are useful not only for coding, although is where we find it is most used.
In the software development industry we usually work in teams, meaning that we have to find a way to organize our code so we don't step on each other. That's what Version Control comes to solve. It keeps versions of our work and the team work, helping to prevent conflicts in the source code.
Ideally Version Control should not impose a workflow, each team should be able to decide how they want to work. Most of the teams that don't use these kind of systems, sooner or later find themselves in troubles for not knowing what code is already in production, who is the author of each change, incompatibility between parts of the application and commented code "just in case".
Not using a Version Control system is consider bad practice, similar to not having backups for a database in production. These systems allow for fast and agile development process and give us the possibility to scale easily. One of the most popular VCS (Version Control Systems) today is GIT. Actually GIT is more than that, is a DVCS (Distributed Version Control System), we will see what that means in a moment.
GIT is a completely free and open source software.
Now that we know a bit more about what GIT is and what it does we can really start.
GIT
I'll asume you already have GIT installed on your machine, in case you don't and you are using Windows, you can download the installer from the official web site and use the default options. My only advice here is that you shouldn't choose vim as the text editor unless you actually know how to use it. When the installer asks you about which text editor you prefer, choose one you feel confortable with. That being said, I also recommend you to learn how to use vim because it's awesome! If you are using Linux you can use your package manager to install it, in Fedora for example you can do "sudo dnf install git".
Think of GIT as just a Persistent Map. We can strip every other functionality for now, to us GIT is only able to store a key-value combination. We can pass any sequence of bytes to it, like a file. GIT will apply the hash algorithm SHA1 to those bytes and store the hash as the key and the bytes as the value. We can assume that each hash will be unique for each sequence bytes.
So we know GIT is able to store bytes, meaning it can store text files, images, binaries, etc. That's great but right now useless… so let's add another layer of functionality: the Stupid Content Tracker. It's not a joke, that's how the official documentation presents it! When we add this layer, we have the functionality to track our files, to actually know what changes they suffer in time. GIT keeps a record of those changes in order. So lets start doing some practice and see this in action!
First we are going to start with a local repository. Everything we do on GIT has to be done inside a GIT repository, so lets create one. Open your Git Bash if you are on Windows or your terminal if you are on Linux.
mkdir GITFromTheBeginning
cd GITFromTheBeginning
git init
Our first command just creates a directory called "GITFromTheBeginning", our second command is to posicionate ourselves inside that directory and the third command, as surely you guessed it, is for initializing the GIT repository. Inside the new directory we find a ".git" directory that will contain all the information related to the repository. Is where everything will get stored. We won't go into much detail but I encourage you to do it if you want a deeper understanding!
Our repository is now created, so lets see how all the Persistent Map stuff mixed with the Stupid Content Tracker work together and what all the fuss is about. We can check the status of it by running the proper command.
git status
We can see something about branch master, ignore that for now… a "no commits" and a "nothing to commit" messages. These messages are telling us that we haven't made any changes and that we have no changes to store in our repository. So lets create a text file, you can do it from your favorite text editor or from the terminal as I will now
echo "This is a README file!" > README.md
I named mine README.md and it has the "This is a README file!" text, but you can name yours whatever you want and put inside any text you like. If you run the status command from GIT, you'll see that shows an "untracked file" and still no commits. This is because we made a change on our Working Area but we haven't told GIT what to do with the change we made. Here is where the commits, that word I've said a few times before, become important. Think of commits as pictures… snapshots. You take a picture of your project at a given time, and then another, and another, and so on. If then you put those pictures together and ordered chronologically, you get the commits for your project. Why would you do something like that? Well, GIT will allow you to travel in time to each snapshot you took, so you can have the entire state of your project restored to a given time. Lets take our first snapshot then, first we need to tell GIT which elements will be posing for the picture.
git add README.md
With this command we are just saying who is going to be in our picture, we ask README.md to go into the Staging Area or Index Area, that's how GIT calls the place where we are going to take the picture. Now lets check the status again
git status
We can see that the Staging Area contains our README.md file, meaning that it is in position for the picture, so lets take it!
git commit -m "First commit!"
With the commit command we took that picture and labeled it so we can remember why we took it. Here we are saying that is just the first one we took: "First commit!". If you get an error message that says "Please tell me who you are" or something like that, then it's surely a fresh installation of GIT and you have to first tell GIT your name and your email so it can add you as the author of each picture you take and your team members will know which pictures you took. To do that, replace in the following commands YOUR_NAME and YOUR_EMAIL with your actual name and email. The name can contain spaces if you want to. After that you can perform the commit with the previous command.
git config --global user.name "YOUR_NAME"
git config --global user.email "YOUR_EMAIL"
Now lets check our photo album, GIT calls it our log so we have to use the log command.
git log
We can see that there is only one commit. The log command will give us the details for it, just ignore the "HEAD -> master" for now. Each commit will be identified by a SHA1 hash, here we can see the persistent map layer in action. The content of the commit is the value and the SHA1 hash is the key.
Awesome! Now you know how to create a GIT repository, we did it on an empty directory, but you can do it in a project that you are working. Instead of using the git add for each file you should you use git add -A to add every file in the directory to the Staging Area in this case. You also know how to create a commit with the files you want to include in it and how to check the log and status!
Before we go on, there are a couple of questions that I usually get asked at this point:
- how often do you have to create commits?
- what's the proper way to name commits?
- can we switch to a visual tool? I hate the console
And here are the answers:
- You should create commits as often as is confortable and useful for you. Remember that you can time travel to each commit you take, so if you take one per week of work it would be hard to undo changes or to take an alternative path in the code and if you take one per line of code it would be equally hard to do that. My personal preference is to make a commit per functionality, PBI or change depending on the project and the work itself. You will get used to do this in your own best way eventually with enough practice.
- In my opinion, the best way to name a commit depends on how you choose to make them. If you are doing one commit per PBI it might be best to name them after that PBI, if you are doing one commit per functionality/change it might be best to briefly explain the functionality/change. But remember to always check with your team if there is an existing convention for the naming of the commits first!
- Ok, first of all, the console is awesome! And second, we are not switching to visual environments because there are tons of them and each team I worked with uses its own. The advantage of learning with the console is that the names are actually kept the same when you move to a GUI. The console is the universal tool, you can actually follow this guide with your preferred tool if you wish to, the names won't change, you will just have to click a few menus to find them!
So far so good, but we still don't know how to time travel and we only have one version of our code... this is useful now but is not what I told you yet. So lets add the next layer, lets include the actual VCS functionality.
GIT manages versions of our code in what it calls branches. When we initialized our repository, GIT created by default a "master" branch. We can check our branches by using the branch command.
git branch
We'll see that there is only one branch right now, called master and we can see that is selected because it has the * symbol to it's left. Imagine now that you want to try something out, but you don't want to try it in your current code. You want it separate, on a different version, a different branch. First you have to create that branch, we can call it dev here.
git branch dev
Now if you check your branches with the branch command you'll see that there are two branches, and if you check the log with the log command you'll notice that both branches have the same commit.
How does this work then? What exactly are branches and how does GIT handles them? Well, we were standing on the master branch, precisely on our "First commit!" commit. So when we used the branch command to create dev, it created a "clone" of the master branch up to the "First commit!" commit. If we would've had more commits ahead, like "Second commit!", those commits would have been ignored and the common parts between those branches would've been only the "First commit!" commit. Why? Because that's where we are standing right now. In short, when we create a new branch it has the same history that our current branch up to our current commit. Branches are just a reference to a specific commit, and commits keep the relationship between them. How does GIT know which one is our current commit then if I can stand in any of them? HEAD is what points to the commit where you are, if you go to a different one, HEAD will reflect that. We'll see how all this works more clearly in just a moment. Right now we are standing in the master branch, as you can see when you run the branch command. Lets move to the dev branch.
git checkout dev
If we run the branch command now we'll see that the active branch is now dev. So let's try something out here, I'm going to add a books.txt file and add a book to its content. You can add some Python lines or anything you wish. As usual, I'll do this through the console so everyone can follow up.
echo "The Little Prince" > books.txt
When we check the status of the repository we can see a new file in the untracked state, so lets move it to Staging. If you want to add all the files at the same time remember to use -A instead of each file name. And then we create a commit.
git add -A
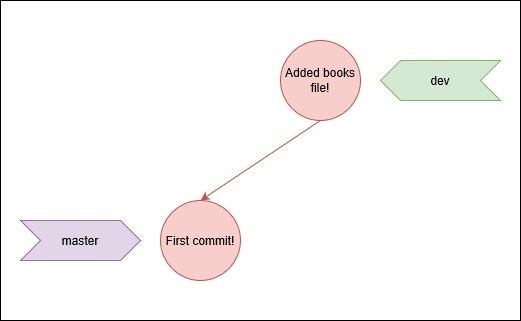
git commit -m "Added books file!"
Checking out the log we can see that the dev branch is one commit ahead to the master branch.
If everything went well, we might want to merge the changes on dev into master. Does that mean that we would have to copy everything and make another commit on master? No! Please never ever do that! GIT is awesome and has a the ability to perform this merge. Can you guess how is the command for that called? That's right! Merge! So lets do that, first we switch to the branch where we want to have the new changes and then we merge from the branch that has the changes.
git checkout master
git merge dev
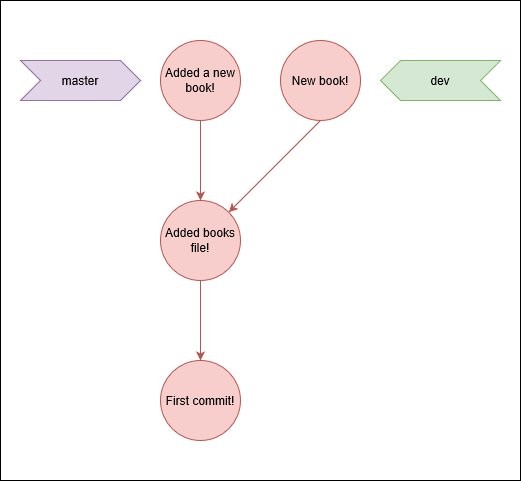
Done, we can check that looking at the log. Is just that easy... sometimes. Lets try an example where its a bit harder. Right now we are on the master branch, so lets add a book here into the books.txt file and commit that change.
echo "Don Quijote de La Mancha" >> books.txt
git add books.txt
git commit -m "Added a new book!"
Now master is one change ahead of dev. Lets switch to dev again. When we do that we can notice that the book we added on master is not there, as expected. So we add a different book.
git checkout dev
echo "1984" >> books.txt
git add books.txt
git commit -m "New book!"
We have now two different versions of the same file on two separate commits, one on each branch.
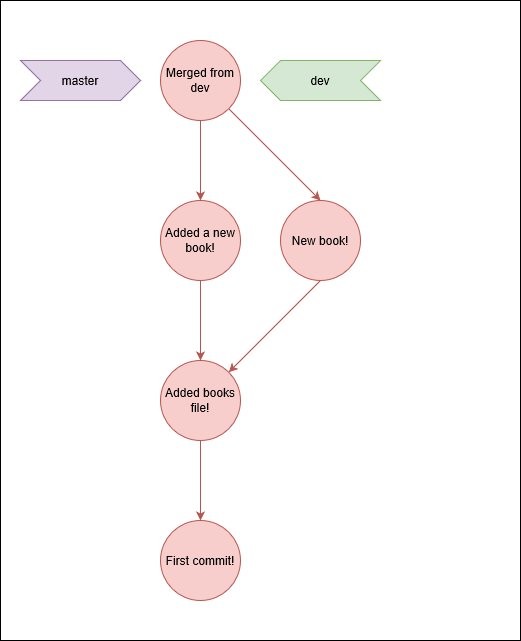
What do you think it would happen if we try to repeat the same thing we did before? Lets try it out, we have to go back to master and merge from dev.
git checkout master
git merge dev
Conflict! Why? We did the same thing we did before! Well, almost the same thing. Now we have the same file modified with different text on the same line, so GIT doesn't know what to do. Should it keep the line of the file in master or the file in dev? Should it combine both on the same line? Add both as separate lines? Add none? Add something different? Endless possibilities and no way to know what we want, hence… conflict! How do we solve this then? Open the conflicted file with your favorite text editor and save the version you want. In my case I want both books to be there, so I'll add first the "Don Quijote" and then "1984". You might find some weird stuff that helps you find the actual change in the files, just delete that before you save it. After that we are going to tell GIT that we solved the conflict by moving the file to the Staging Area with the add command and finally we'll make the commit that represents the merge between the two commits we have now.
git add books.txt
git commit -m "Merged from dev"

If we run the log command now, standing on master, with the "oneline" and "graph" arguments we will see something similar to the image above.
git log --oneline --graph
Lets try to merge the changes that we have on master but into dev. What do you think it will happen? Would we have to make the conflict resolution again and risk ourselves to end up with two different commits on each branch again? Lets find out
git checkout dev
git merge master
What? No conflict? What happend?
We already solved that conflict! There is an existing path for the dev branch that can catch up with master, so it follows it. When the merge consist only on moving the branch reference to a different commit it's called fast-forward, and that's what happened here.
In addition to creating a repository and commits, you also know how to perform a merge with and without conflict now! That's enough to start working on your local machine and keep track of projects where you are alone and without the need of a remote repository.
How do we work with teams then? How can we see the changes other people make to the code and how can we share our changes with them? Well, here is where the remote repository comes in. In GIT every repository is the same, that's why it's a Distributed Version Control System. Usually the preferred way to work is to have what it's called a blessed repository and make every other repository sync with that one. If for some reason the blessed repository is lost, any other can take its place. You can also have multiple remote repositories but we won't dive into that here.
The most common scenario is when you already have an existing remote repository and you need to set up your local one to sync with it. That can be done through the clone command. If we go to any Cloud platform for GIT, like GitHub or Azure DevOps, we can create our own remote repository. Lets do that, most platforms show a simple tutorial we can follow to do it easily. Once you've done that you can copy the URL for the repository you've created and use it as parameter for the clone command. Lets first move to a different directory, and then clone it!
cd
git clone {REPOSITORY_URL}
This will create a new directory with the name of our repository. If we move inside we can start working and make any changes we want, knowing for sure that all of them will be done locally without affecting the remote repository unless we explicitly say so. Lets add a songs list in here.
cd REPOSITORY_NAME
echo "Proud Mary" > songs.txt
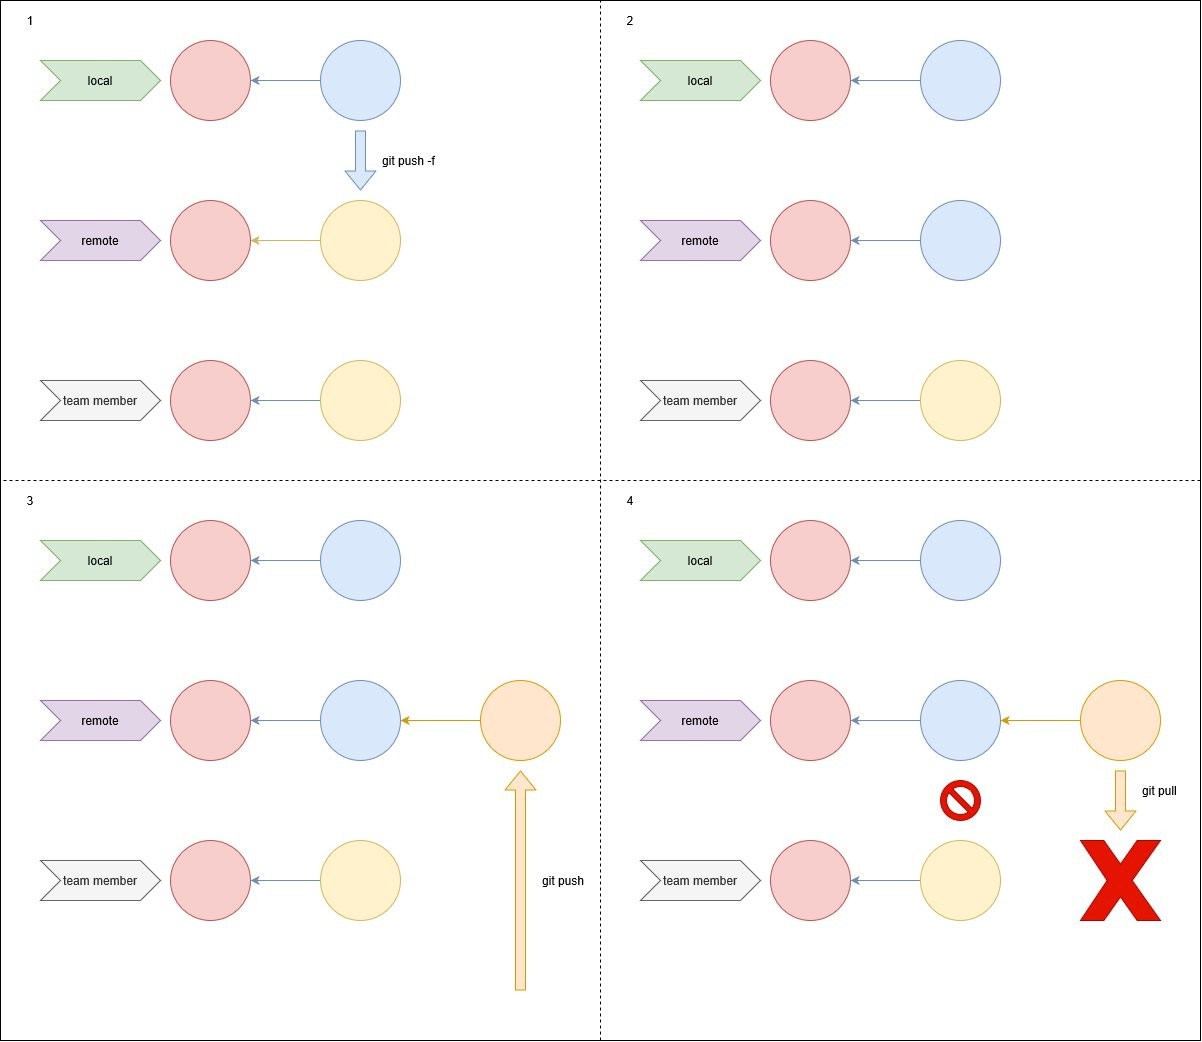
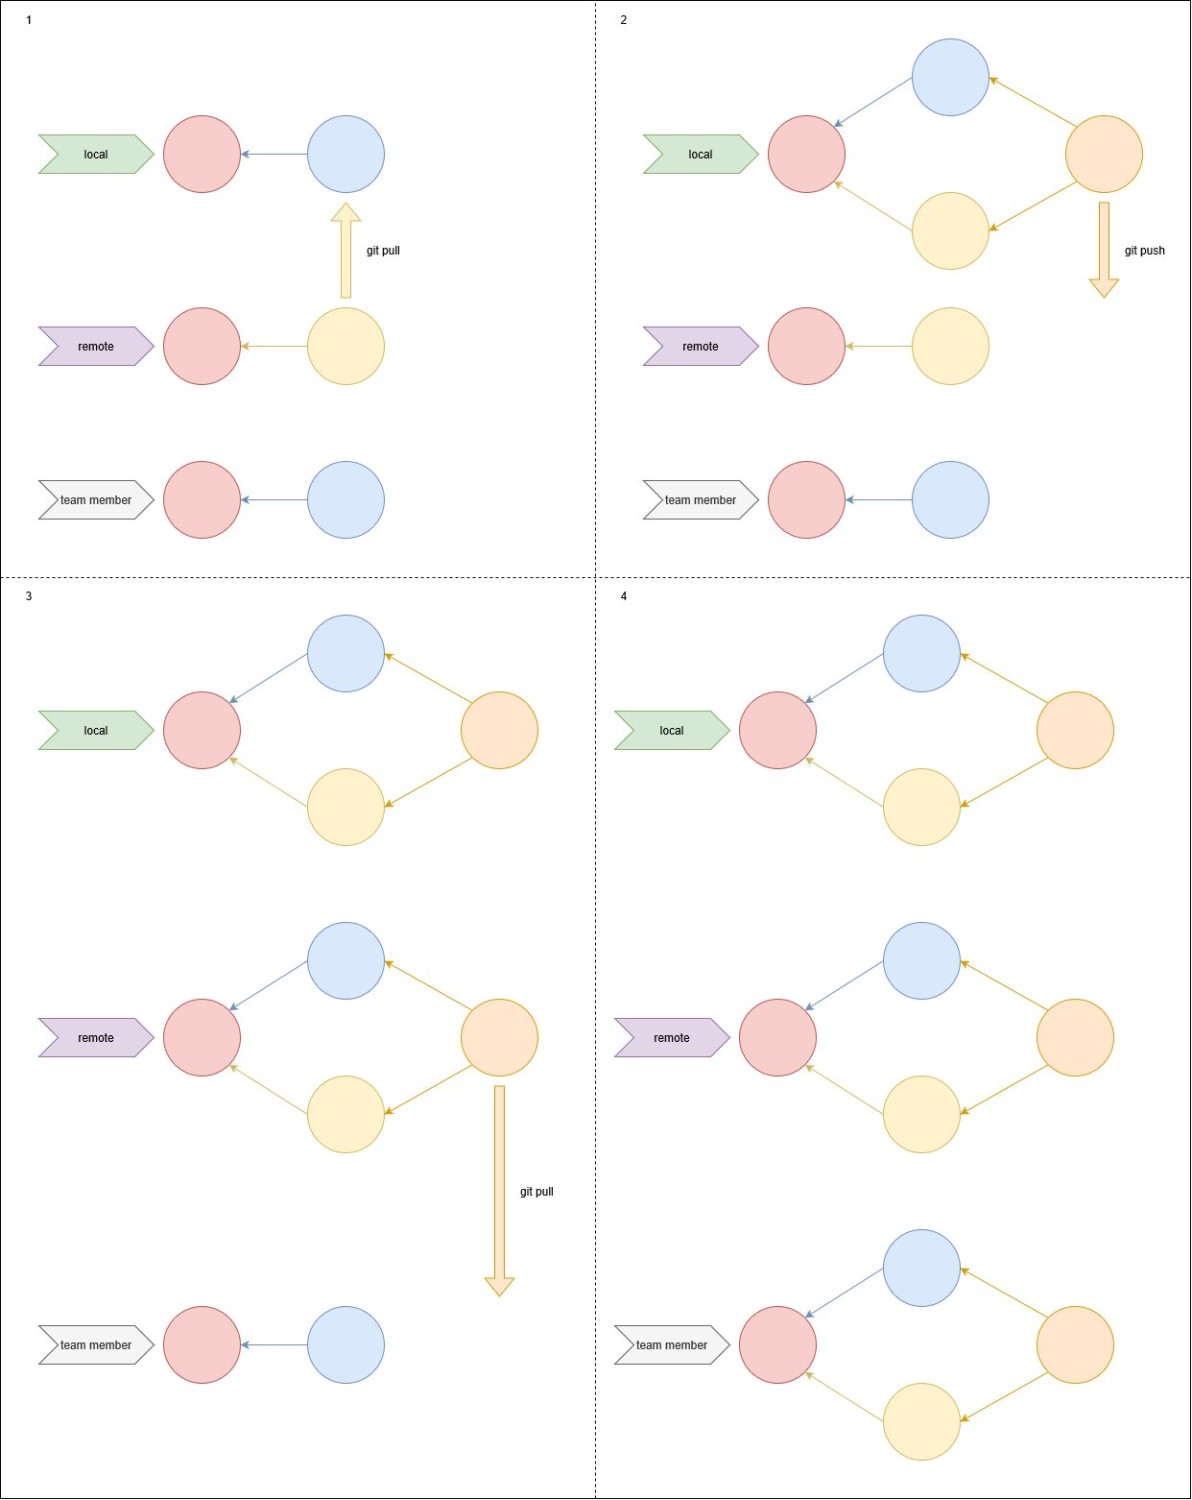
We can now follow the already known process and add the commit into our master branch. Everything is still on our local repository. How can we sync our local with the remote? We have mainly two commands to do that. In order to send our changes to the local repository we have to use push. So lets start with that.
git push
If we now check the remote repository from GitHub or the platform you chose, you'll see the songs.txt file there. Now lets add a song from the platform itself. This is not a good practice and we are going to do it just for demonstration purposes. You should never edit files directly from the GitHub platform, specially on the master branch, in a real project. Why? Because it's extremely hard to revert any changes and keep a clean history if you make a mistake.
Now we add a different song into our local repository.
echo "Fortunate Son" >> songs.txt
Commit your change and try to push now. Can you guess what will happen? We got a conflict! Since we cannot solve it by merging on the remote repository, we have to do it in our local. To do that, first we have to fetch the changes from the remote and merge them. The commands to do that are fetch and merge, surprisingly. But there is a command that is the combination of both: pull. So we first pull the changes, solve conflicts if any and then push. Thats the proper way to sync the branch in your repository.
git pull
Solve conflict!
git push
And now we have the repositories in sync!
Can I just use a push force as the error message suggest when I did the push without the pull? No, please don't. Unless you want to make enemies for life, leave the push -f command for someone who knows exactly what is doing. When you do that you erase any commit in the remote repository that is not your local history, causing the sync between your colleagues and the remote repository to break.
git push -f
git pull + git push
Now that we have a better understanding of how to work collaboratively, we will proceed with time travel to change the history. This is actually really easy to do, but we can only do it on our local repository, so if we have already synced with the remote, we might better use the revert command or manually change what we want and add a new commit. You can learn more about the revert command on your own if you wish, is not hard but this guide is already long enough!
Create a few more commits with mistakes, maybe add books to our songs list. Two or three commits will suffice for this example. After we've done that, we check the log.
git log --oneline --graph
Now lets go back to the commit before those mistakes were made so we can add the correct information and do a push. We only need to know the id, that would be the hash, from the commit we want to go to. The initial part of the hash is enough to identify it, so what the log is showing us with the "oneline" argument will suffice.
By default this command is going to perform a "soft" reset, meaning that will leave us with the changes that we are undoing in the Working Area. If you want to lose those changes instead, we need to do a hard reset. To do that just add the "hard" parameter.
git reset --hard COMMIT_ID
Now we can add actual songs and forget about the changes we did before. Then we can create the commit or commits and do the push with the correct data.
This concludes a basic understanding of GIT, enough to get you started!
Workflows
Usually we don't work by just randomly doing pulls and pushes to master when we are on a real project. Most of the time the master branch is protected, with policies that prevent us from being able to directly push to it. Instead we work in separated branches. With GitHub Flow and Gitflow we work in feature branches that get merged into a dev branch to later be merged into master through Pull Requests. PRs aren't actually a part of GIT, but they are implemented in almost every cloud platform. They allow us to push a separate branch to the remote server and request a merge into another branch. This gives us a lot of flexibility, security, order and peace of mind. We won't dive into PRs here but I strongly recommend you to read more about them, I'll leave some interesting links at the end of this article for you to follow if you are interested.
I'm not going to do the actual explanation for GitHub Flow and Gitflow because there are guides that are super clear and complete about this! So instead I will provide the links to those guides
Links of Interest
These links are not in a particular order
Workflows, Methodologies and Pipelines
- Pull Requests
- Agile Methodology
- Continuous Delivery Principles
- Continuous Integration
- Continuous Deployment
Cloud Platforms for GIT
Thanks!
Thank you for reading this article, I hope it was helpful to you and as fun to read as it was to write. Everything here I took from the GIT documentation and my own experience, here you can check the GIT website.